Hello friends! I hope you are doing amazing on this terrific Tuesday. Today I am hopping with some Crafty Collaborators along the Technique Tuesday Blog Hop as we share lots of inspiration related to scoring. There are several of us hopping today - you will find the list to follow along towards the bottom of my blog post - so sit back and enjoy your favorite coffee, tea, water or smoothie as we share some handmade projects with you!
Today's Project
I love adding simple borders to card layers with scoring... it's a simple way to add dimension and texture to your cards while keeping them clean and simple. I also like to use scoring when creating folders to gift my cards... you can read about that by clicking here.
Project Details
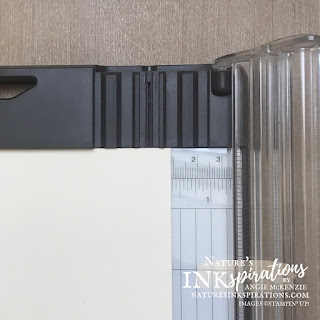
The three lines of scoring was inspired by the Paper Lattice that coordinates with the Plentiful Plants Bundle which is also part the Bloom Where You're Planted Suite. The Very Vanilla Thick square card bases are layered with a single Very Vanilla square which has been scored on all sides. The scoring blade on the Paper Trimmer was simple to use for these simple score lines. Flip the card layer over and using the right side of the trimmer as the measuring guides, score at 1/4", 3/8" and 1/2". Turn the layer 180 degrees (to the opposite side) and repeat the scoring. Turn the layer 90 degrees and repeat the scoring. Turn the layer 180 degrees and repeat the scoring. Flip the layer over and you will now have your card layer with the raised score lines with the criss-cross sections being identical (vertically or horizontally) depending on the direction you turn it.
The above pictures can help you picture why you need to do the opposite side scoring... just click on the pictures so you can zoom on them to see the score lines better. TIPS: I actually ran the scoring blade back and forth four (4) times for each score line... the number of times that you repeat the scoring will determine how prevalent it appears on the front. Flipping the cardstock over before scoring keeps the cardstock cut edge that has a slight lip on the right side after you've completed the scoring.
The Paper Lattice sheet was trimmed down to a one row section that fit nicely between the plant image stamped in Garden Green ink onto Very Vanilla cardstock. The plant pot was stamped in Soft Suede and Night of Navy inks onto Very Vanilla cardstock. The stamped images were die-cut with coordinating dies. The sentiment was stamped in Soft Suede ink onto Very Vanilla cardstock scraps. The plant was adhered over the lattice with Multipurpose Liquid Glue. The plant pot was adhered with Mini Glue Dots. The sentiment strip was adhered with Stampin' Dimensionals.
The inside panels were scored along two sides only (left and top edges) to compliment the card fronts. One of the insides included the remainder of the stamped sentiment from the card front while the second inside is available for any occasion. The envelope fronts and flaps were stamped to compliment the card giving the recipient(s) sneak peeks of what is inside.
More Inspiration
I hope you have been inspired to create a card to share with someone using some simple score lines. Now it's time to continue along the blog hop - you're currently with me, Angie McKenzie, at #16 - to get more inspiration from the others... so look at the list below and continue along. You definitely don't want to miss any.
You Can Make This Card!
Here's What You'll Need to Get Started...
BASICS
- Clear Blocks A, D; Stamparatus; Small Grid Paper; Paper Trimmer; Stampin' Cut & Emboss Machine; Paper Snips; Multipurpose Liquid Adhesive; Mini Glue Dots; Stampin' Dimensionals; Bone Folder
- Clear Blocks A, D; Stamparatus; Small Grid Paper; Paper Trimmer; Stampin' Cut & Emboss Machine; Paper Snips; Multipurpose Liquid Adhesive; Mini Glue Dots; Stampin' Dimensionals; Bone Folder
STAMPS
- Plentiful Plants Bundle (includes the Perfect Plants Dies)
- Plentiful Plants Bundle (includes the Perfect Plants Dies)
INK
- Garden Green, Night of Navy and Soft Suede Classic Stampin' Pads
- Garden Green, Night of Navy and Soft Suede Classic Stampin' Pads
PAPER
- Very Vanilla and Very Vanilla Thick Cardstocks; Paper Lattice; Very Vanilla Medium Envelopes
- Very Vanilla and Very Vanilla Thick Cardstocks; Paper Lattice; Very Vanilla Medium Envelopes
You can purchase any of these supplies from my online store if you live in the USA and do not already have a Stampin' Up!® demonstrator.
Time to Use Your Paper Trimmer!
PAPER CUTS
- Very Vanilla - 3-3/4" x 3-3/4" (x4); scraps for stamping and die-cutting
- Very Vanilla Thick - 4-1/4" x 8-1/2" scored at 4-1/4" (card base) (x2)
- Very Vanilla - 3-3/4" x 3-3/4" (x4); scraps for stamping and die-cutting
- Very Vanilla Thick - 4-1/4" x 8-1/2" scored at 4-1/4" (card base) (x2)


Very pretty!
ReplyDeletegreat tips!
ReplyDeleteI love the clean and simple look of this card!
ReplyDeleteThese are so cute-perfect design and layout.
ReplyDeleteLovely card x
ReplyDelete