 |
| Garden Birdhouses and Through It Together for a special Get Well Card |
Happy Wednesday! Hello and welcome to my blog. Today I am hopping with some Crafty Collaborators along the Crafty Challenge Blog Hop and the challenge this month is a sketch challenge! There are so many ways to interpret these sketches so you will see lots of inspiration. There are several of us hopping today - you will find the list to follow along towards the bottom of my blog post - so sit back and enjoy your favorite coffee, tea, water or smoothie as we share some handmade projects with you!
Today's Project
Stephanie created this sketch challenge for us this month and it was just the inspiration that I needed to create a card for a work colleague of my hubby who is in the ICU fighting COVID.

Project Details
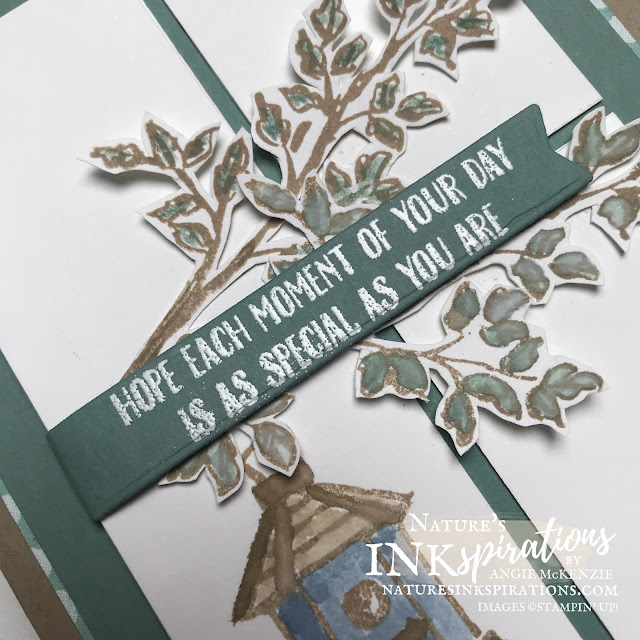
Garden Birdhouses is one of those stamp sets that I just had to have as we have a birdhouse that is frequently used on our own property. It brings so many smiles to our faces seeing the visitors that frequent it year after year. The heart in the sketch has been replaced with two branch images stamped with Crumb Cake ink onto Basic White Cardstock. The leaves were damp watercolored with Soft Succulent ink using the ink pad lid as the watercolor palette and my Fine Tip Water Painter. Next, the water painter was cleaned and dried (by gently squeezing it between a microfiber cloth or paper towel) before damp watercoloring the branches with Crumb Cake ink. Then the branches were fussy cut and layered together onto four Basic White rectangles.
A birdhouse was stamped in Crumb Cake ink onto a scrap piece of Basic White Cardstock. The birdhouse was damp watercolored with Crumb Cake and Misty Moonlight inks being sure to clean and dry the tip between color changes.
After the birdhouse was dry, the image was aligned under the branches and cut to size to match the other rectangles.
The Garden Birdhouses sentiment was stamped in VersaMark onto Soft Succulent cardstock and heat embossed with White Stampin' Emboss Powder. The sentiment was then die cut with Blooms Dies label die. The sentiment label was off centered and adhered with Stampin' Dimensionals. The extra length of the label allowed me the creative assembly of wrapping it around the back of the rectangles for a finishing touch.
Assembly tips: This card has several behind the scenes layers making it easier to assemble! First, the four Basic White Cardstock rectangles were adhered to four same size Basic White Thick Cardstock rectangles. Second, the four layered rectangles were adhered to a Soft Succulent Cardstock layer that allowed for flush alignment to the edges giving perfect spacing. And third, with the wrapping of the label behind this Soft Succulent layer, the back was built up with two additional same color rectangles on either side of the label to make the back layer flush so the layer would be leveled from the front and side views.
The Soft Succulent Cardstock layer and Pattern Party Designer Series Paper layer were adhered to a Crumb Cake Cardstock Card Base. And last, but not least, the layered rectangles layer was adhered to the card base.
This special get well card was completed with coordinating layers to compliment the front. The branch once again was stamped with Crumb Cake ink onto Basic White and damp watercolored with Soft Succulent ink. The Through It Together sentiments were stamped in Crumb Cake ink.
The front of the envelope and the envelope flap were also stamped to compliment the card front.
More Inspiration
I hope you have been inspired to create a handmade card to share with someone to let them know you are there for them. Now it's time to continue along the blog hop - you're currently with me, Angie McKenzie, at #17 - to get more inspiration from the others... so look at the list below and continue along. You definitely don't want to miss any.
You Can Make This!
Here's What You'll Need to Get Started...
BASICS
- Clear Blocks B, C, G, I; Stamparatus; Small Grid Paper; Paper Trimmer; Paper Snips; Heat Tool; Stampin' Cut & Emboss Machine; Stampin' Dimensionals; Multipurpose Liquid Adhesive
STAMPS
- Garden Birdhouses Photopolymer Stamp Set; Through It Together Cling Stamp Set
INK
- Crumb Cake, Soft Succulent and Misty Moonlight Classic Stampin' Pads; VersaMark Pad
PAPER
- Crumb Cake, Basic White and Basic White Thick Cardstocks; Pattern Party 12" x 12" Host Designer Series Paper
OTHER
- Basics Embossing Powders; Bloom Dies (included with the Bloom Hybrid Embossing Folder)
You can purchase any of these supplies from my online store if you live in the USA and do not already have a Stampin' Up!® demonstrator.
Time to Use Your Paper Trimmer!
PAPER CUTS
- Basic White - 1-1/2" x 2-1/8" (x3); 3-1/8" x 4-3/8" (inside); scraps for stamping
- Basic White Thick - 1-1/2" x 2-1/8" (x4)
- Crumb Cake - 8-1/2" x 5-1/2" scored at 4-1/4" (card base)
- Soft Succulent - 3-1/8" x 4-3/8", 3-3/4" x 5"; scraps (for embossing and die-cutting)
- DSP - 3-7/8" x 5-1/8"


Stunning card Angie x
ReplyDeleteThank you, Vickie!
DeleteI love how you've used the sketch. Great designing!
ReplyDeleteThanks so much, Ginger. I appreciate it. :)
DeleteVery pretty card. Love your patterned paper peeking out!
ReplyDeleteThanks so much, Lorraine. :)
DeleteSuch a pretty card. I love the DSP border - adds just the right touch!
ReplyDeleteThanks, Libby! It's so hard for me to add in DSP with my cards so this was definitely a personal challenge! Looking forward to using some more.
DeleteLove your card - so soft!!
ReplyDeleteThanks so much, Ginny, I appreciate it. Definitely a difficult to make for the reason, but hopefully, it will be appreciated by his family.
DeleteI love how you used the bird house and your card is beautiful!
ReplyDeleteThanks so much, Robbie. I appreciate it.
DeleteVery pretty!
ReplyDelete