Isn't this catalog cover amazing?!?! If you haven't been able to see the inside of this publication, yet, believe me, you really want to! The inside is just as amazing as the cover - overflowing with ideas, inspiration and some new exciting products! On page 126, there is a new coloring tool - a Soft Pastels Assortment of 8 colors that I enjoyed playing with for today's blog post.
Today's Project
I have always wanted to play with pastels... so this has been a new fun experience for me! I originally thought that they would be like the crayons that Stampin' Up! used to have several years ago, but they weren't so I went on a Google search and found lots of amazing inspiration from different artists. My favorite pastels artist is Susan Jenkins. Here is her video for beginners that shows 12 Soft Pastel Techniques.
Blending, Side Stroke, Hatching, Drawing and Dusting were some of the Pastel Techniques that I used for today's project. There are so many stamps we can use to color with the pastels; however, I wanted to put my hand at making something look like an actual painting. After watching Susan's video, I was so inspired that I cannot wait to try more of these techniques over the next few months so stay tuned for more pastels inspiration!
FYI: I have referred to the Pastel Techniques generally as "strokes" as the way you hold and move the pastel determines the technique you are using and the technique used is definitely the preference of the artist.
Project Details
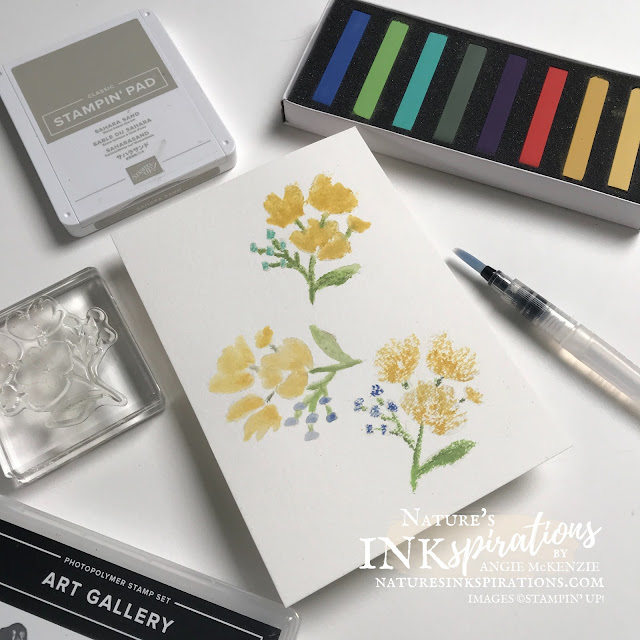
I began with a full size sheet of Fluid 100 Watercolor Paper and stamped the Art Gallery floral image with Sahara Sand ink. Honestly, if had not been playing with these for the blog hop, I probably would have framed this little masterpiece. **wink**
Each image was colored with the Daffodil Delight, Mango Melody, Granny Apple Green and Mossy Meadow pastels directly over the stamped image. The first image also used the Coastal Cabana pastel. The remaining images used the Night of Navy pastel.
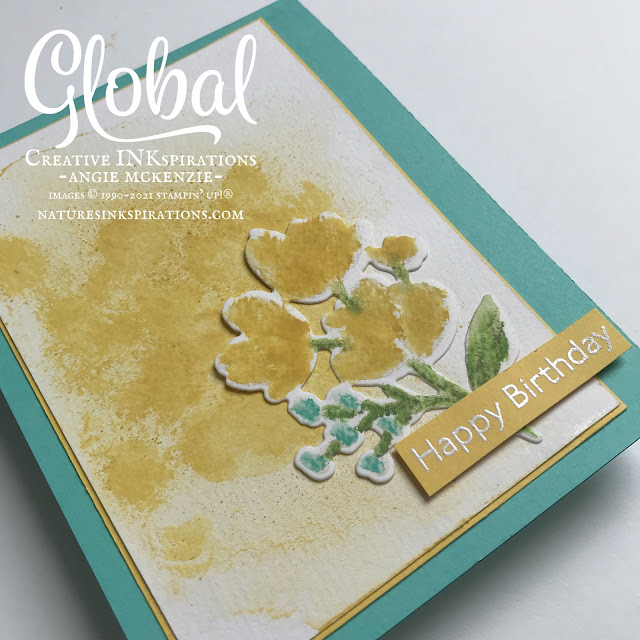
A second piece of Fluid 100 Watercolor Paper was cut in half to 3-1/2" x 5" to create the background using the Dusting Technique! This was a lot of fun by using a Stampin' Spritzer and a handheld grater from my kitchen... the effect reminds me of the Brushos we used to have. I spritzed the paper first, then dusted and spritzed again. Rolled the paper around some and let it air dry. All the little pieces did not dissolve with the water so I ended up using a Water Painter to smoosh the remnants...which you'll see in the finished cards.
A second background was created without spritzing the watercolor paper first. And a larger third background was created using the color left in the Water Painter from the previous two backgrounds. Just a tad more of pastel (water painter direct to the pastel) was added for a bit more intensity.
The pastel floral images were die cut with the coordinating Floral Gallery Dies and matched to the best background for the pastel image.
Coastal Cabana and Daffodil Delight cardstocks were chosen to compliment the Pastel Strokes then Water Painter floral image with a sheat embossed sentiment on Daffodil Delight.
Night of Navy and Granny Apple Green cardstocks were chosen to compliment the Pastel Strokes floral image using the scalloped edge Penned Flowers Dies to compliment the softness of the Blending, Side Stroked, Hatched, Drawing and Broken Color techniques. A heat embossed sentiment on Night of Navy was the finishing touch.
So Saffron and Vellum cardstocks were chosen to compliment the Water Painter direct to Pastels floral along with the softer watercolored background. The Lovely You sentiment was inked with Memento directly onto the vellum which was adhered to the ends with Tear & Tape Adhesive. TIP: Remember Memento will take a while to dry -- do not touch the vellum to prevent smearing.
The inside layers were replicated to coordinate with the card fronts. Shimmery White cardstock was left blank to allow plenty of room for corresponding to the recipients.
And going along with the simplicity of the designs, the envelope fronts and flaps were stamped with the coordinating sentiments.
You Can Make These Cards and Here's What You'll Need to Get Started
BASIC SUPPLIES:
- Clear Blocks B, D, G
- Paper Trimmer
- Cut & Emboss Machine
- Heat Tool
- Stamparatus
- Small Grid Paper
- Stampin' Spritzers
- Paper Snips
- Water Painters
- Tear & Tape Adhesive
- Multipurpose Liquid Glue
- Mini Stampin' Dimensionals
- Bone Folder
- Simply Shammy
STAMPS:
- Art Gallery Photopolymer Stamp Set (included in the Art Gallery Bundle for 10% Bundled Savings until June 30, 2021)
- Lovely You Cling Stamp Set
INK:
- Sahara Sand Classic Stampin' Pad
- VersaMark Pad
- Tuxedo Black Memento Ink Pad
- Soft Pastels Assortment
PAPER:
- Fluid 100 Watercolor Paper
- Shimmery White Cardstock
- Night of Navy Cardstock
- Granny Apple Green Cardstock
- Daffodil Delight Cardstock
- Coastal Cabana Cardstock
- Soft Saffron Cardstock
- Vellum Cardstock
- Basic White Medium Envelopes
OTHER:
- Floral Gallery Dies (included in the Art Gallery Bundle for a 10% Bundled Savings)
- Penned Flowers Dies
- Basics Embossing Powders
You can purchase any of these supplies from my online store if you do not already have a Stampin' Up!® demonstrator. The Art Gallery Bundle is featured on the cover of the January - June 2021 Mini Catalog and the bundled savings is available through June 30, 2021; otherwise, the items are available individually in the new 2021-2022 Annual Catalog!
More Inspiration
I hope that you have enjoyed this inspiration to use the new Soft Pastels Assortment so you can create something with a new coloring tool. Now, let's pop over for some more inspiration with my friend, Tania (click here), across the waters! She's on the 2021 Artisan Design Team and has a wonderful one sheet wonder project that will inspire you to create multiples... you'll love it, I'm sure.


Fun Angie! I've got to try these techniques out!!
ReplyDeleteWauw! Love it! I played around a bit with the pastels and I sure have to try this. Thank you for sharing this with us!
ReplyDelete