Happy Thursday, y'all! I'm so glad that you're here and hope you are feeling thankful for this day! Today I am hopping with some crafty collaborators along this Spring Themed Blog Hop as we are sharing lots of inspiration for helping you get past any winter blues you might be feeling. There are several of us hopping today - you will find the list to follow along towards the bottom of my blog post - so sit back and enjoy your favorite coffee, tea, water, or smoothie as we share some handmade projects with you!
Today's Project
On the cold wintry, snowy day here in NW Ohio, I am drawing inspiration once again from my current favorite television series, Sweet Magnolias. With snow on the ground, thinking of the warmer days ahead keeps you warm inside. Sweet Magnolias as the most amazing introduction that ends with the picture for today's card.
Project Details
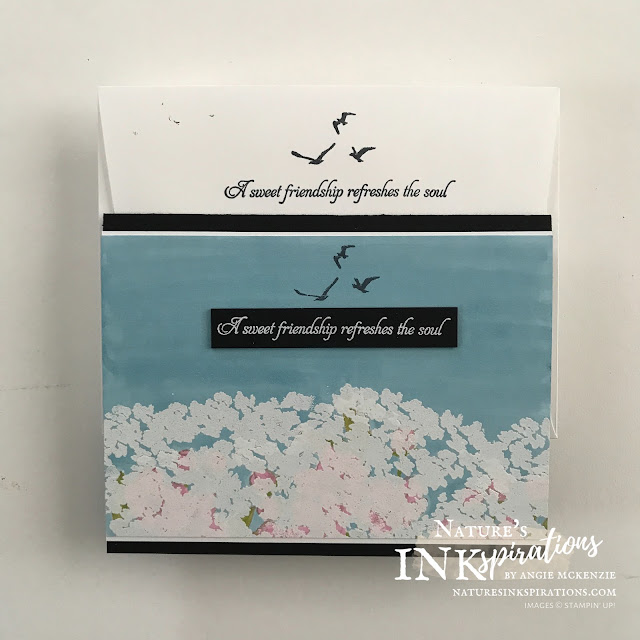
The large Forever Blossoms image was inked in Sahara Sand and stamped along the bottom of a Basic White card front size layer. The blossoms were colored with a Light Rococo Rose Stampin' Blends Marker, the leaves were colored with Light Granny Apple Green and Light Old Olive Stampin' Blends Markers, and the remainder of the sky was colored with a Dark Balmy Blue Stampin' Blends Marker.
During the creative process, the next step was not originally part of the plan, so I did not take a photo of the colored blossom. The above picture (the back of the colored layer) gives you an idea of how the blossoms were stamped and colored.
The Queen Anne's Lace fill image was inked in VersaMark and stamped over the colored blossoms. This was randomly repeated until the colored were almost completely covered. Next the images was covered with White Stampin' Emboss Powder and heat embossed. And "Viola!" - you have the creation of lovely Spring blossoms!
The Butterfly Wishes sentiment was inked in VersaMark and heat embossed with White Stampin' Emboss Powder. The sentiment was trimmed to 1/2" x 3" and adhered to two additional same size Basic Black cardstock layers. The sentiment was adhered to the colored layer with Multipurpose Liquid Glue. The Sailing Home seagulls were inked in Memento and stamped about the sentiment. A 1/2" strip was trimmed off of the bottom of the colored layer and set aside. The colored layer was adhered to 3-7/8" x 5-1/2" Basic White cardstock layer. The layers were adhered to a top-folding horizontal Basic Black card base.
One mustn't leave the inside and the envelope untouched so here's what I did! The inside was layered with the 1/2" strip along with another layer of Basic White cardstock. No sentiment was stamped this time allowing the card to be used for any occasion. The Basic White Medium Envelope flap was stamped to compliment the card front while the front was stamp with the sentiment alone.
What You'll Need to Make This Project
BASIC SUPPLIES:
- Clear Blocks A, D, H, I
- Paper Trimmer
- Multipurpose Liquid Glue
- Stamparatus
- Small Grid Paper
- Heat Tool
- Bone Folder
STAMPS:
- Forever Blossoms Cling Stamp Set
- Sailing Home Cling Stamp Set
- Butterfly Wishes Cling Stamp Set
- Queen Anne's Lace Photopolymer Stamp Set
INK:
- Sahara Sand Classic Stampin' Pad
- Tuxedo Black Memento Ink Pad
- VersaMark Pad
- Rococo Rose Stampin' Blends Combo Pack
- Granny Apple Green Stampin' Blends Combo Pack
- Old Olive Stampin' Blends Combo Pack
- Balmy Blue Stampin' Blends Combo Pack
PAPER:
- Basic White cardstock
- Basic Black cardstock
- Basic White Medium envelope
OTHER:
- White Stampin' Emboss Powder
You can purchase any of these supplies from my online store if you do not have a Stampin' Up!® demonstrator. Order any supplies in increments of $50 and you can earn Level 1 and/or Level 2 Products for FREE from Stampin' Up! during Sale-A-Bration which ends on February 28, 2021.


Oh, is this ever pretty, Angie!
ReplyDeleteThanks so much, Chris! I loved creating this one for sure! x
DeletePretty card x
ReplyDeleteThanks so much, Karen. x
DeleteI love that show as well, can't wait for the next season! Perfect CASE, well done!
ReplyDeleteOh yay!!!! Another fan!!! Thanks so much, Nina! x
DeleteLovely 😊
ReplyDeleteThanks so much, Donna. :)
Delete