Are you wanting to reach out to touch these cards?!? If so... your senses will soon be overflowing!
Imagine that you are enjoying yourself on a lovely, cool Autumn day at a local fair in your community... lots of favorite smells from years past are delighting your nose as you meander along to find the source. But wait! You spy a warm, fuzzy throw that would make the perfect gift for a friend or family member for the holidays. Something that you would be tempted to purchase several of as your list grows longer. While checking out, you are intrigued by the personal touch the vendor used to wrapped up the throw(s) with a complimentary ribbon and a tasteful touch for this Season of Giving. With your arms full like your heart, you spot a custom wooden sign across the way that would make the perfect gift for your best friend. Happy with this additional purchase you decide to carry the throw(s) atop the wooden sign. You notice a chill in the air as the sun goes behind the clouds and feel snowflakes falling on your face... you look down and smile as the snowflakes float to cover the ground... ahhhhh! It's the most wonderful time of year!
Stamp the Buffalo Check stamp with Soft Suede ink onto a 4" x 5-1/4" piece of Very Vanilla cardstock. Apply Coastal Cabana, Poppy Parade and Night of Navy inks with blending brushes (or sponge daubers, if you have them or wait til January to order some from my online store or better, yet, you can order them next month if you join my team!) to create the soft pastels of the "throw blanket". Trim to size (approx. 3-1/4" x 4-7/8") as pictured and emboss with the Tasteful Textile 3D Embossing Folder. Wrap a piece of Mint Macaron 1/2" Basket Weave Ribbon (from the Gilded Autumn Suite!) around the throw, tie a knot and fray the tails after arranging. Die cut a bough from the Beautiful Boughs Dies with a scrap of Mint Macaron cardstock. Die cut the berries from the Poinsettia Place Designer Series Paper using the Poinsettia Dies. Die cut the snowflakes from the So Many Snowflakes Dies with Vellum cardstock. Stamp the Wrapped in Christmas sentiment in Soft Suede ink onto a scrap piece of Very Vanilla cardstock and die cut with the Tasteful Labels Dies.
Apply Soft Suede ink to the raised side of the Pinewood Planks 3D Embossing Folder and emboss with a piece of Very Vanilla cardstock measuring 3-5/8" x 5-1/8". Adhere the throw blanket layer to the debossed wood layer with liquid glue. Wrap a piece of Mint Macaron Basket Weave Ribbon (secured on the back with Tear & Tape Adhesive) around a 4" x 5-1/4" piece of Soft Suede cardstock. Adhere the previous layers with liquid glue to the Soft Suede layer which is in turn adhered to the top folding vertical Soft Suede cardbase.
Adhere the bough, berries and snowflake dies with Mini Glue Dots. Adhere the sentiment with Stampin' Dimensionals using the double adhesive to adhere the snowflakes to the card front.
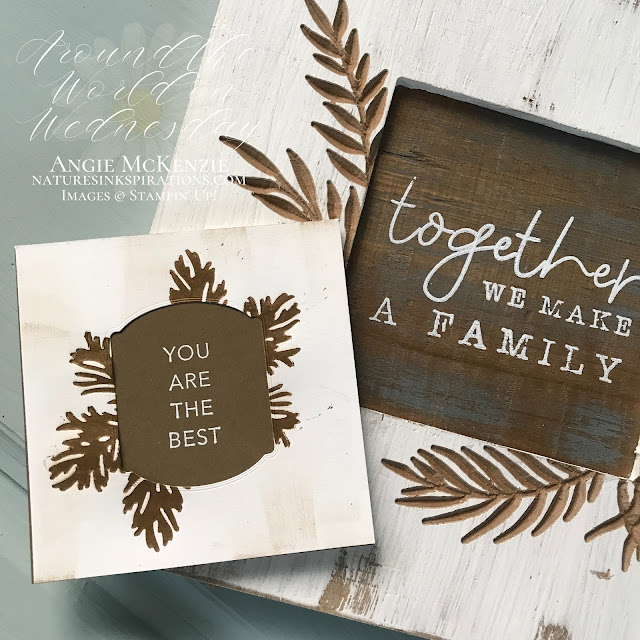
This second card was inspired by many of the crafty items that you saw at the fair. There is nothing like a crafter saying "I can make that!", right?!? Well, in my case, I couldn't make the inspiration that I purchased from Hobby Lobby aka my 2020 craft fair, but it was used for inspiration for this 4-1/4" square card using my much loved letterpress technique to mimic the etched wood.
Ink the layered boughs (click here for details) with Soft Suede ink and emboss on 4-1/4" square piece of Whisper White cardstock. Repeat. Wipe a dry Broad Water Painter across Soft Suede ink and brush across the letterpressed layer to create a weathered look. Repeat until desired. Die cut the center with a Tasteful Labels Die. Stamp the Tasteful Touches sentiment image in VersaMark ink onto a 4-1/4" square piece of Soft Suede cardstock. Spinkle with White Stampin' Emboss Powder and heat emboss on low with your Heat Tool. Run Stampin' Seal closely along the back of the die cut opening and along the edges. Adhere to the embossed Soft Suede cardstock. Fold a 4-1/4" x 8-1/2" piece of Whisper White Thick cardstock in half and burnish with a bone folder to create a top folding card base. Adhere the layers to the front of the card base with liquid glue.
The inside is just as important as the card front! Adhere the negative die cut to the inside top panel with liquid glue to continue the theme. Stamp the bough image in Soft Suede ink on a Whisper White Medium Envelope to complete the finishing touch.
I hope these projects using products from the 2020-21 Annual Catalog and the August-December 2020 Mini Catalog have inspired you to think of ways that you can use them yourself with your projects to create texture! Now, hop along with me, Angie McKenzie, to see more Wednesday inspirations from my amazing friends Around the World. Just click the daisy below to go to Mary’s blog to see what textures she's been inspired with for her project, or scroll down the name list to follow along because you sure don't want to miss any.
We love reading your comments!
Thanks for stopping by my little corner of the world!
Have a blessed day!


Place an order of $50 or more from me during the month of NOVEMBER 2020
and you will receive one or more EXCLUSIVE PROJECT TUTORIALS for FREE!
Contact me for details!

Do you love these projects?
You can find the supply list to create them on your own at the bottom of this blog post. Purchase supplies you do not have through my online store just by clicking on the product picture/description.
I would love to be your Stampin' Up!® Demonstrator!
If you don't already have a demonstrator and need any stamping supplies, just click on the Shop picture at the top right side of my blog that goes directly to my online store. Or you can just drop me an email, if you have any questions. It would be such a pleasure to stamp with you!

- Coordinating colors you will want to have for creating alternative projects: Basic Gray, Calypso Coral, Cinnamon Cider, Daffodil Delight, Rich Razzleberry, Soft Sea Foam, Whisper White
Subscribe to the DECember 2020 Paper Pumpkin Kit from 11 November to 10 december at paperpumpkin.com!
Note: Supplies may be limited toward the end of the subscription period.
When ordering, Product Suites are bundled, making ordering super easy! With one item number, you can order the stamp/die bundle at a discounted price, plus the paper and any other coordinating products, giving you everything you need for creating perfectly coordinated projects! I love this ordering option, and I know you will too. Try it!!! Just click on the above Online Shoppers Code, or any of the items in the Supply List below to go to my store. Use this Online Shoppers Code at checkout and I will send you a special thank you for your order. If your order is over $150, please don't use the code (you'll miss out on your own Stampin' Rewards if you use it) as you'll still receive something special in your mailbox from me.
and you will receive one or more EXCLUSIVE PROJECT TUTORIALS for FREE!
Contact me for details!
- Visit my online store here.
- Shop the Clearance Rack here.
- Subscribe to Paper Pumpkin here.
- Earn FREE Stampin' Up! Products with my Nature's INK Points Reward Program - a special thank you program just for my online customers!
- Be a Nature's INKer with me! I love what I do and would be thrilled to have you on my team while creating, sharing and inspiring others together with you! Do you love creating projects for others? Do you love it all? Would you like to save money on your stamping and/or scrapbooking supplies? Yes?!? Click here for more info.
- Subscribe to my newsletter to get all the latest news and updates on what's happening and, do not worry, you can unsubscribe from it at any time - no questions asked!
- Follow my blog with Bloglovin.


Beautiful Angie!
ReplyDeleteThank you, Tania!
DeleteFabulous projects Angie! xxx
ReplyDeleteThanks so much, Cheryll! x
DeleteBeautiful!! Love the sponging of colour onto the buffalo plaid piece!!
ReplyDeleteThanks so much, Annette. I definitely love coloring the plaid this way as it lends itself to so many more color options! :)
DeleteYour plaid card is soooooo beautiful
ReplyDeleteThanks so much, Danielle! x
DeleteOh Angie, I absolutely adore your first card. Had me thinking immediately of warm snuggly blankets in the winter. So emotive, it's gorgeous xx
ReplyDeleteAhhhh, thanks, Mikaela! So glad you could feel what I was trying to interrupt with the card! zz
DeleteMikaela is absolutely right. Your first card had me thinking of snuggling up in a blanket on a cold winter day. Your cards are beautiful!
ReplyDeleteThanks so much, Teri! So glad you felt all snuggly! :)
DeleteThe creations are perfect, full of depth and texture. And the explanations are just right to reproduce at home. Superb inspiration Angie!
ReplyDeleteThanks so much, Aurélie, I appreciate it so much! x
DeleteGorgeous cards Angie, fabulous texture and inspiration x
ReplyDeleteThanks so much, Angela, I appreciate it! x
DeleteWhat a wonderful, cozy feel your plaid card brings with it and the extra little note is simply precious!
ReplyDeleteThanks so much, Chris! They were so fun to create while trying to express the feel of the textures. :)
DeleteGorgeous, Angie! Love the soft colors in the plaid and the ribbon is a perfect touch.
ReplyDeleteThanks so much, Anne Marie! I appreciate it.
Delete