Welcome to another edition of the Global Creative INKspirations Blog Hop! You are either starting here or coming from Danielle's blog. We hope that you are enjoying these special monthly posts as much as we enjoy sharing this time with you! This month we are focusing once again on the products from the August-December 2020 Mini Catalog.
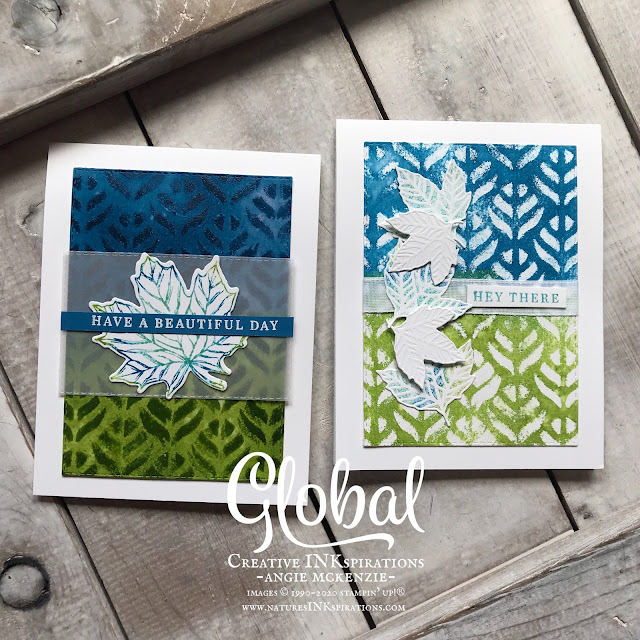
This seasonal catalog is full of amazing products so today I am sharing with you projects I created with products from the double page spread on pages 46-47 that we inspired by these pictures!


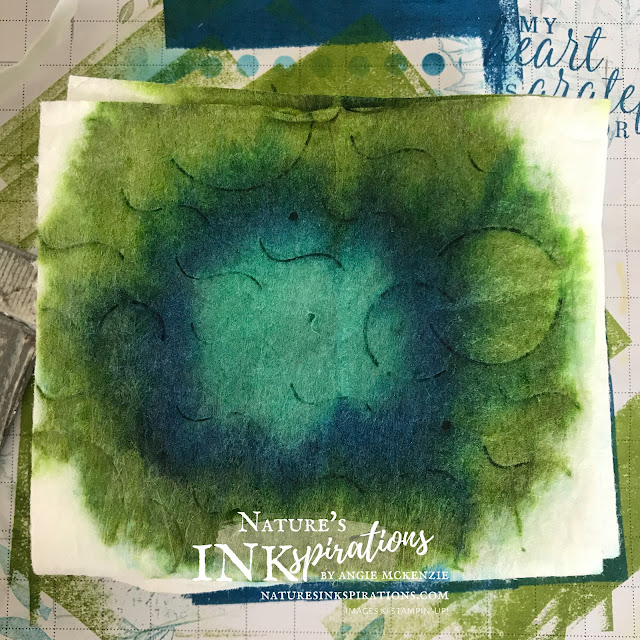
The second largest die from the Stitched Rectangles Dies was used to cut down the backgrounds. The Baby Wipe Technique was used for inking the remaining items that were added to the card fronts. I traditionally have always put drops randomly around a baby wipe to create the homemade ink pad for this technique. For these projects, I used tips from Jennifer that can come in handy for using this technique with the Stamparatus! I folded two baby wipes to fit the Clear D Block... stamp your stamp on the baby wipes to make an impression... add your ink refill colors where you would like to see the colors on the image and then tape the edges with tape so you can lift the wipes to your stamp on the Stamparatus! Pretty amazing, huh? **wink**

I take daily morning walks along the metropark bike trail behind our property that covers 40 miles... so the 1.5-3 mile walks I take are only a touch of the beauty in this amazing part of NW Ohio! I love fall especially around here as it is just breathtaking along with all the fun activities thanks to all the local farmers! Today's cards are inspired by these colors using my favorite new fall stamp set and my returning favorite bundle!

I used the Faux Monoprint Technique of fellow Ohioan Jennifer McGuire, I can see why this is her favorite technique, at the moment, to create the backgrounds! It's another fun messy, inky fingers technique that is soooo worth the time, effort and mess!
The Direct Ink to Paper technique was used to apply the Granny Apple Green and Pacific Point inks to a 4-1/4" x 5-1/2" piece of Thick Whisper White cardstock (standard card front size). Sponge daubers were used to blend the colors where they met and any other areas that needed more ink. It does not matter how bad it looks... you just want a LOT of ink with a LOT of coverage. The colors dry quickly... once they are dry to the touch, center your Decorative Mask and directly apply your VersaMark ink pad for full coverage. You can lift the mask to make sure you have it all inked and realign, if necessary, for additional inking. Generously apply Clear Stampin' Emboss Powder and heat set with the heat tool.
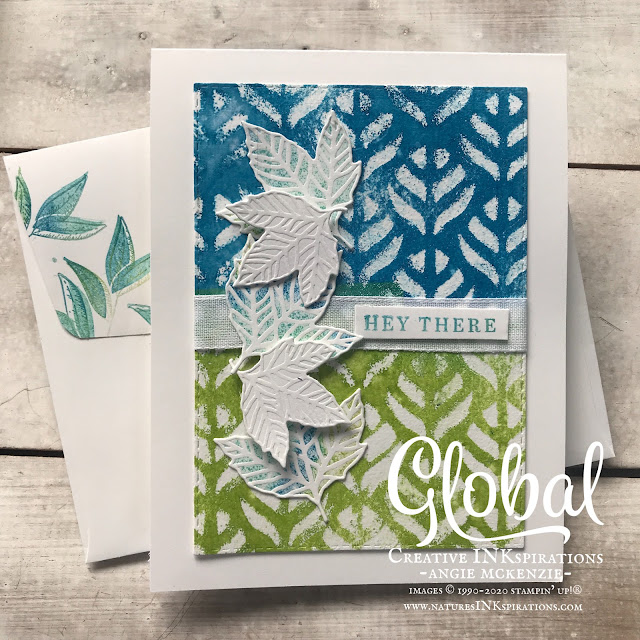
Now comes the fun part! Tape (painters tape is what Jennifer uses... I used washi tape) another piece of Thick Whisper White cardstock (same exact size) on one end so it opens and closes like a book. Place the colored piece on a towel or microcloth and heavily spritz with water. Close the "book" and run it through your Cutting and Embossing Machine 2-3 times like you would an embossing folder. Open and viola! You have two amazing backgrounds just by creating one!!! **SORRY that I didn't take pictures of the process!!**
Well, I didn't tape mine as I wasn't using the stamp with my Stamparatus... so this picture shows you how I applied my colors using my Granny Apple Green, Pacific Point and Coastal Cabana ink refills. Doing it this way was amazing!!! So be forewarned you'll be seeing more cards using this revised technique!
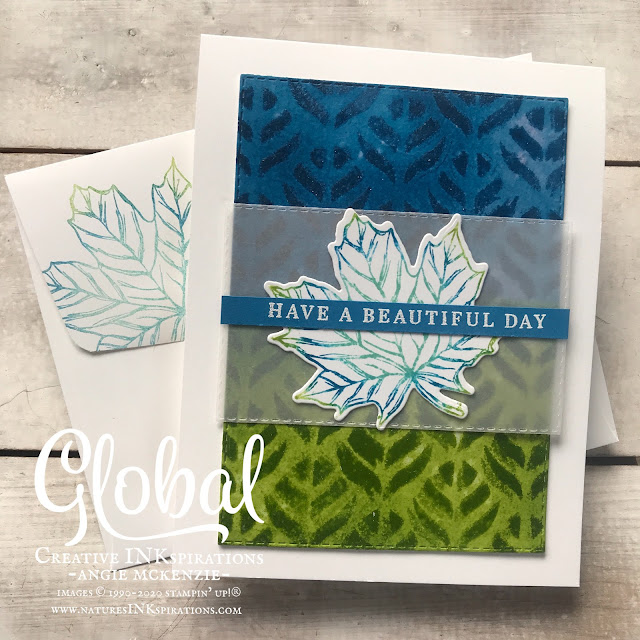
Who says maple leaves have to be red?!? For this time of year, they are still green here in Ohio, so I used my inspirational picture to help with reflective colors... The vellum die cut panel softens the blending of the two colors while the white heat embossed sentiment strip strategically aligns with the blended line of color. The sentiment strip was adhered with liquid glue to the leaf and trimmed to align with the vellum panel. While stamping the Gather Together maple leaves to die cut, I also stamped the envelope and off stamped the inside panel.
The scraps from the card front were trimmed to fit the inside. The sentiment was stamped in Pacific Point.
I hope that today's project has inspired you to try some of these fun techniques with these amazing fall-themed products!!! Now, let's pop over for some more inspiration across the waters with Tania (click here)! She has more amazing ideas for you to try... you'll be amazed, I'm sure.
Global Creative INKspirations Blog Hop
Angie McKenzie - US - YOU ARE HERE
Thanks for stopping by my little corner of the world!
Have a blessed day!
Do you love these projects?
You can find the supply list to create them on your own at the bottom of this blog post.
I would love to be your Stampin' Up!® Demonstrator!
If you don't already have a demonstrator and need any stamping supplies, just click on the Shop picture at the top right side of my blog that goes directly to my online store. Or you can just drop me an email, if you have any questions. It would be such a pleasure to stamp with you!

Bonus Days are here! For every $50 you spent by August 3, 2020 (before shipping and tax) you earned a $5 Bonus Days coupon code that can be used now through August 31, 2020. The special code should be in your e-mail just waiting to be used! Any questions, please ask.

ABOUT THE SEPTEMBER KIT
Hello Pumpkin
Details
- Kit contains enough supplies to create 20 cracker box treat packages.
- Each cracker box treat package can be customized to celebrate Halloween, Thanksgiving, the autumn season, or all three!
- Coordinating Colors: Bumblebee, Basic Black, Cajun Craze, Cinnamon Cider, Mossy Meadow, Old Olive, Pumpkin Pie, white
SUBSCRIPTION INFORMATION
Subscribe to the September 2020 Paper Pumpkin Kit from 11 August to 10 September at paperpumpkin.com!
Note: Supplies may be limited toward the end of the subscription period.
When ordering, Product Suites are bundled, making ordering super easy! With one item number, you can order the stamp/die bundle at a discounted price, plus the paper and any other coordinating products, giving you everything you need for creating perfectly coordinated projects! I love this ordering option, and I know you will too. Try it!!! Just click on the above Online Shoppers Code, or any of the items in the Supply List below to go to my store. Use this Online Shoppers Code at checkout and I will send you a special thank you for your order. If your order is over $150, please don't use the code (you'll miss out on your own Stampin' Rewards if you use it) as you'll still receive something special in your mailbox from me.
- Visit my online store here.
- Shop the Clearance Rack here.
- View the newest products available for Beginning Stampers here.
- Subscribe to Paper Pumpkin here.
- Earn FREE Stampin' Up! Products with my Nature's INK Points Reward Program - a special thank you program just for my online customers!
- Be a Nature's INKer with me! I love what I do and would be thrilled to have you on my team while creating, sharing and inspiring others together with you! Do you love creating projects for others? Do you love it all? Would you like to save money on your stamping and/or scrapbooking supplies? Yes?!? Click here for more info.
- Subscribe to my newsletter to get all the latest news and updates on what's happening and, do not worry, you can unsubscribe from it at any time - no questions asked!
- Follow my blog with Bloglovin.
#beautifulautumnstampset #gathertogetherstampset #gathertogetherbundle #fauxmonoprinttechnique #babywipetechnique #stampingtechniques #cardtechniques #stampinup #handmadecards #stampinupinks #seasonalcards #naturesinkspirations #globalcreativeinkspirationsbloghop


What an amazing cards! And I just have have have to try this technique. Love it!
ReplyDeleteThanks so much, Danielle! You'll love using this technique! It's a lot of fun and can be rather addicting!!! Can't wait to see what you create with it. :)
DeleteBeautiful Angie!
ReplyDeleteThank you, Tania. :)
Delete